【AI始めました】MNISTで自分の手書き数字を認識してみる

アプリ開発

前回の記事で画像処理についてまとめましたが、今回、ついにAIに手を出しました。

AIは、5年ぐらい前にChainerというフレームワークを使って少し触っていたことがありましたが、5年のブランクを経て、今主流のTensorFlow2を触ってみました。

以前と比べて情報も多く、始めやすい環境になっていると思います。

今回の記事は、TensorFlow(テンソルフロー)のチュートリアルとなっているMNISTのプログラムを少し弄って、自分の手書き数字を認識してみました。

MNISTとは

MNIST(Modified National Institute of Standards and Technology)は、手書き数字画像の大規模データベースです。

0〜9の数字を手書きした、28×28ピクセルの画像が大量にあり、機械学習やAIの学習に利用できるように公開されています。

TensorFlowを始めた人が、Hello World的に利用できるようになっており、とりあえずMNISTが動いたから環境構築オッケーという感じでスルーされがちですが、今回はMNISTを使って遊びます。

TensorFlowにおけるMNISTのチュートリアルでは、TensorFlowをインストールした端末で、以下の流れのプログラムを動かします。

  1. MNISTデータベースをダウンロードする
  2. 学習モデルを作成し、MNISTのトレーニングデータで学習を行う
  3. 学習が完了したモデルで、テストデータを検証し、正答率を出力する

ここでは、チュートリアルのプログラム解説は割愛しますが、正答率は97%程度になると思います。

そして、ふむふむ、いい感じだね。となってスルーされます。笑

今回はスルーせず、本当に数字の認識ができるのか確かめてみます。

MNISTのモデルを保存して数字識別機を作る

まず、MNISTを使って数字識別機を作ります。

具体的には前章の1、2を行い、学習済みのモデルを保存します。

保存した学習済みのモデルは、別のプログラムで読み込んで識別機として利用することができます。

下記のプログラムでは、MNISTのチュートリアルのモデルを少し改良していて、正答率は99%ぐらいです。

import os
os.environ['TF_CPP_MIN_LOG_LEVEL'] = '2'
import tensorflow as tf
import numpy as np
print ("-----------------------------------")
print (" TensorFlow version is ", tf.__version__)
print ("-----------------------------------")
mnist = tf.keras.datasets.mnist
(x_train, y_train), (x_test, y_test) = mnist.load_data()
x_train, x_test = x_train / 255.0, x_test / 255.0
model = tf.keras.models.Sequential([
tf.keras.layers.Conv2D(32, kernel_size=(3, 3),
activation='relu',
input_shape=(28, 28, 1)),
tf.keras.layers.Conv2D(64, (3, 3), activation='relu'),
tf.keras.layers.MaxPooling2D(pool_size=(2, 2)),
tf.keras.layers.Dropout(0.25),
tf.keras.layers.Flatten(),
tf.keras.layers.Dense(128, activation='relu'),
tf.keras.layers.Dropout(0.5),
tf.keras.layers.Dense(10, activation='softmax')
])
loss_fn = tf.keras.losses.SparseCategoricalCrossentropy(from_logits=True)
model.compile(optimizer='adam', loss=loss_fn, metrics=['accuracy'])
print ("-----------------------------------")
print ("*Train model")
model.fit(x_train, y_train, epochs=5)
print ("-----------------------------------")
print ("*Evaluate model")
model.evaluate(x_test, y_test, verbose=2)
print ("-----------------------------------")
print ("*Save model")
model.save('mnist_model')
view raw mnist.py hosted with ❤ by GitHub

このプログラムを実行すると、カレントディレクトリに「mnist_model」というディレクトリができます。これが数字識別機です。

手書き数字作成プログラム

続いて、手書き数字作成プログラムを作成します。

処理の流れは以下のようにします。

  1. 数字をいくつか手書きする
  2. 認識ボタンをクリックする
  3. 数字を一つ一つ検出して画像化
  4. 数字識別を実行
  5. 識別結果を表示する

プログラムは下記です。

このレベルの高度なプログラムが200行未満で出来てしまうことに技術の進歩を感じます。

# -*- coding: utf-8 -*-
import tkinter
from tkinter import messagebox
from PIL import Image, ImageGrab, ImageOps
import cv2
import numpy as np
import tensorflow as tf
#---------------------------------------------
# MNISTで手書き数字を認識する
#---------------------------------------------
class mnist_play:
#---------------------------------------------
# コンストラクタ
#---------------------------------------------
def __init__(self):
# 処理開始
self.window = self.create_window()
#---------------------------------------------
# クリック時の処理
#---------------------------------------------
def on_pressed(self, event):
self.sx = event.x
self.sy = event.y
self.canvas.create_oval(event.x, event.y, event.x, event.y, outline = self.color, width = self.width)
def on_released(self, event):
pass
#---------------------------------------------
# ドラッグ時の処理
#---------------------------------------------
def on_dragged(self, event):
self.canvas.create_line(self.sx, self.sy, event.x, event.y, fill = self.color, width = self.width)
self.sx = event.x
self.sy = event.y
#---------------------------------------------
# Pillow->cv2の変換
#---------------------------------------------
def pil2cv(self, image):
new_image = np.array(image, dtype=np.uint8)
if new_image.ndim == 2:
pass
elif new_image.shape[2] == 3:
new_image = cv2.cvtColor(new_image, cv2.COLOR_RGB2BGR)
elif new_image.shape[2] == 4:
new_image = cv2.cvtColor(new_image, cv2.COLOR_RGBA2BGRA)
return new_image
#---------------------------------------------
# 認識ボタン押下
#---------------------------------------------
def ninshiki(self):
# 画面を画像化
x = self.window.winfo_x()
y = self.window.winfo_y()
w = self.window.winfo_width()
h = self.window.winfo_height()
img = ImageGrab.grab(bbox=(x,y,x+w,y+h))
im_crop = img.crop((10, 30, img.size[0], img.size[1]-20))
# 画像から数値部分を検出
src = self.pil2cv(im_crop)
gray = cv2.cvtColor(src, cv2.COLOR_BGR2GRAY)
retval, bw = cv2.threshold(gray, 50, 255, cv2.THRESH_BINARY | cv2.THRESH_OTSU)
contours, hierarchy = cv2.findContours(bw, cv2.RETR_LIST, cv2.CHAIN_APPROX_NONE)
# 数値候補に対する処理
res = []
for i in range(0, len(contours)):
# 輪郭の領域を計算
area = cv2.contourArea(contours[i])
# ノイズ(小さすぎる領域)と全体の輪郭(大きすぎる領域)を除外
if area < 1e2 or 1e5 < area:
continue
# 矩形の中の矩形を除外
isjogai = False
ix, iy, iw, ih = cv2.boundingRect(contours[i])
for j in range(0, len(contours)):
if j == i:
continue
# 輪郭の領域を計算
area = cv2.contourArea(contours[j])
# ノイズ(小さすぎる領域)と全体の輪郭(大きすぎる領域)を除外
if area < 1e2 or 1e5 < area:
continue
jx, jy, jw, jh = cv2.boundingRect(contours[j])
if jx < ix and jy < iy and jx+jw > ix+iw and jy+jh > iy+ih:
isjogai = True
break
if isjogai:
continue
# 外接矩形を処理
if len(contours[i]) > 0:
# 画像の認識した部分に矩形を出力する
x, y, w, h = cv2.boundingRect(contours[i])
cv2.rectangle(src, (x, y), (x + w, y + h), (0, 255, 0), 2)
# 認識した部分を切り取り、28×28の白黒反転画像に変換
nimgsize = w if w > h else h
nimgsize = nimgsize + 60
new_img = Image.new("RGB", (nimgsize, nimgsize), (255, 255, 255))
kirinuki = im_crop.crop((x, y, x + w, y + h))
new_img.paste(kirinuki, (int((nimgsize - w)/2), int((nimgsize - h)/2)))
new_img = ImageOps.invert(new_img.convert('L'))
new_img = new_img.resize((28, 28))
# 画像をNumpy配列に変換し、X座標とともに結果配列に格納
result = {}
result["x"] = x
result["img"] = np.array(new_img) / 255.0
res.append(result)
# 外接矩形された画像を表示
cv2.imshow("Image Recognition", src)
cv2.moveWindow('Image Recognition', 100, 600)
# 保存したMNISTのモデルを読み込む
model = tf.keras.models.load_model('mnist_model')
probability_model = tf.keras.Sequential([model, tf.keras.layers.Softmax()])
# 認識した数字を左から右への順に並び変える
res = sorted(res, key=lambda x: x['x'])
# 数字を推定する
ans = []
for r in res:
predictions = probability_model(r["img"].reshape(1,28,28))
ans.append(np.argmax(predictions[0]))
# 結果表示
msg = str(len(res)) + "個の数字を認識しました。\n" + "".join(map(str, ans))
messagebox.showinfo('数字認識結果', msg)
#---------------------------------------------
# メインウィンドウ作成
#---------------------------------------------
def create_window(self):
# ウィンドウ作成
window = tkinter.Tk()
window.title("MNISTで手書き数字を認識する")
# キャンバス作成
self.canvas = tkinter.Canvas(window, bg = "white", width = 1200, height = 200)
self.canvas.pack()
# 認識ボタン
quit_button = tkinter.Button(window, text = "認識", command = self.ninshiki)
quit_button.pack(side = tkinter.RIGHT)
# マウスイベントのバインド
self.canvas.bind("<ButtonPress-1>", self.on_pressed)
self.canvas.bind("<ButtonRelease-1>", self.on_released)
self.canvas.bind("<B1-Motion>", self.on_dragged)
# 線の色を設定
self.color = "black"
# 線の太さを設定
self.width = 15
return window
#---------------------------------------------
# GUI実行
#---------------------------------------------
def run(self):
self.window.mainloop()
if __name__ == '__main__':
mnist_play().run()
view raw mnist_play.py hosted with ❤ by GitHub

作成した数字識別機を実行してみる

mnist_play.pyを実行すると、横に細長いウインドウが立ち上がります。

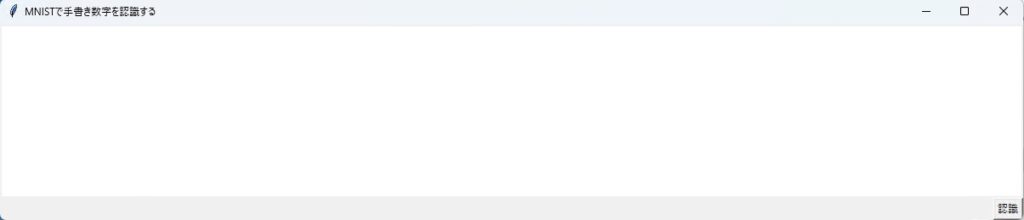
白い部分にマウスを使って数字を書き、認識ボタンを押下すると、

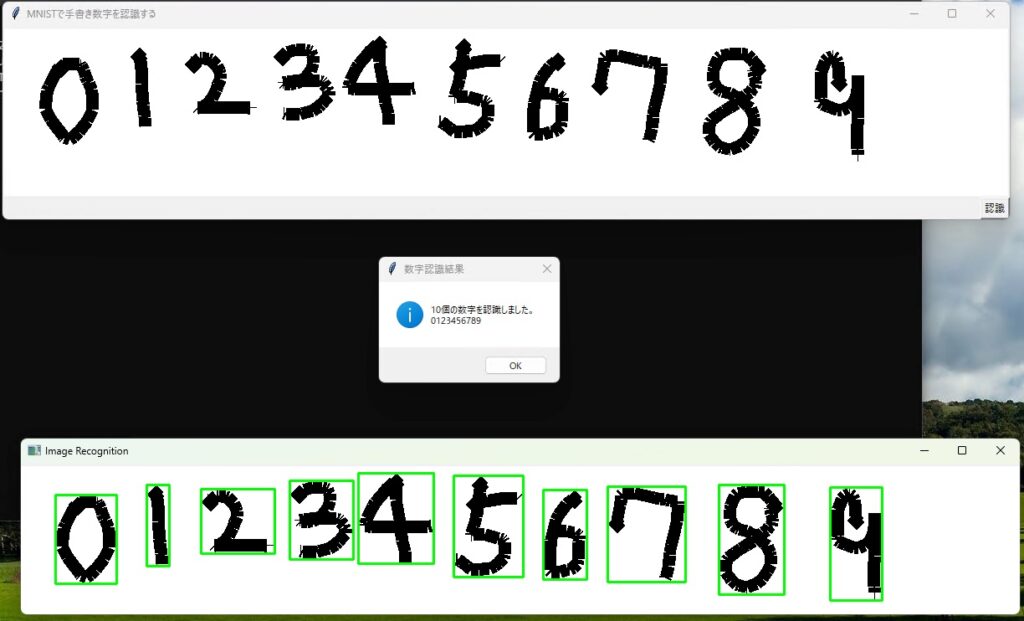
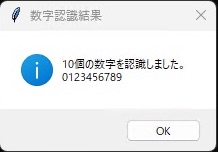
無事識別出来ました。これでHello World完了です。

AI五目並べを作ってみました。

コメント

タイトルとURLをコピーしました